Post System Run Review
- At the end of the run, examine the cartridge. The reaction chambers in all lanes must be completely filled with no bubbles.
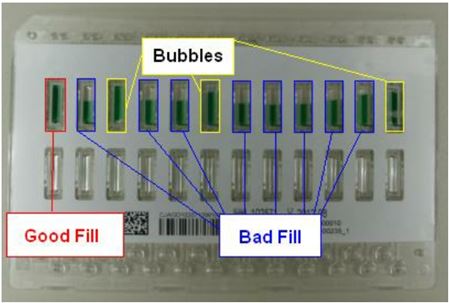
- Remove and examine the test strips.
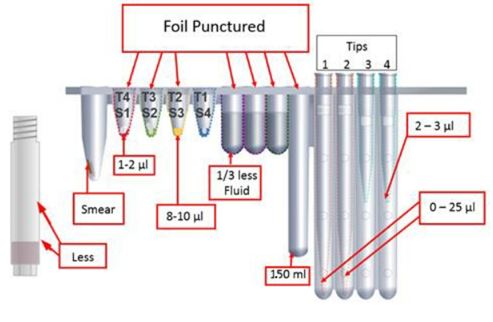
- Check that all foil covers of reservoirs and snap-ins are pierced.
- The Reaction tube will have a smear of particles along one side.
- The extraction snap in may have a small amount of particles and up to 1 - 2μL liquid in the bottom.
- The Wash Reservoir will have 1/3 less liquid remaining than the other reservoirs.
- The Waste Reservoir will have approximately 1 to 1.5mL (depending on assay) of liquid with no solids.
- Tip 4 may have 2 - 3μL of fluid present. Tips 1 and 2 may have up to 25μL present.
- Navigate to the Results tab, and open the run to review the Results against 5-Channel Qualification Kit Result Review Table.
- If one or more samples fail, document what failed in the checklist Qualification Checklist under the Comments.
- Perform Initial Field Service Action.
- Then, perform follow up run.
- If sample passes, document the result in Qualification Checklist. If sample results still fail, document the result in Qualification Checklist. Do not turn the instrument over to the customer.
- Do not leave reagents from qualification at customer site- remove or destroy them.
The new qualification kit contains target DNA. Use standard laboratory practices when removing used strips and sample buffer tubes from the racks. Clean racks according to standard laboratory procedures.
- Be sure to reconfigure the system configuration screen back to its prior settings before returning the instrument to the customer. Please make sure that the worklist type (24 Sample or 2000 Sample) is back to its original setting.
- Go to Maintenance, then Environmental Variables, and reset to Default.